Everyone who has ever had to run more than one air test in an actual field testing situation has had a problem with their air meter. The typical response is to tighten the latch tabs and really crank down on the latches to seal the lid to the pot. Most technicians assume this is where the leak is coming from, when in reality, it is rarely the source of the problem. This action may seemingly solve the immediate problem, but will soon result in bent latch tabs, a damaged lid gasket, and trashed clamp assemblies, all without actually addressing the problem. I am here to give you a few places (and the tools) to potentially locate the actual leak in the field and fix the root problem.
The first piece of equipment I would always advise to have with you is a spray bottle (like an old Windex or cleaner bottle). If your air meter is leaking air, fill this bottle with soapy water (which can most of the time be found on the job site) and spray the full air meter down with it. It will bubble up where the leak is coming from. Often times this will solve the problem by revealing a loose seal around the air meter pump, a dried out lid gasket, or a loose seal on any of the lid accessories. If the answer is not obvious like tighten the chamber cap or replace the petcock, then there are still some places to check before cranking down the latches.
The next place to check is the air meter pump. There can always be a leak in the gasket sealing the top of the pump to the chamber cap, so that is the first place to check. The next step would be to remove the pump entirely, using a ½” wrench (another tool that should be kept in all field technician’s trucks). Once the air pump has been removed, remove the check valve which is screwed into the bottom of the pump. Using your mouth, try to blow air in both directions through this check valve. Air should only move in one direction. If it either doesn’t move in either direction OR moves freely in both directions, chances are the check valve has become clogged with a small amount of concrete. You can try to clean this in a small amount of white vinegar, but at $11.25 (OCT 2023) it is a pretty affordable piece to replace. A clogged or faulty check valve is by far the most common reason an air meter might be leaking air.
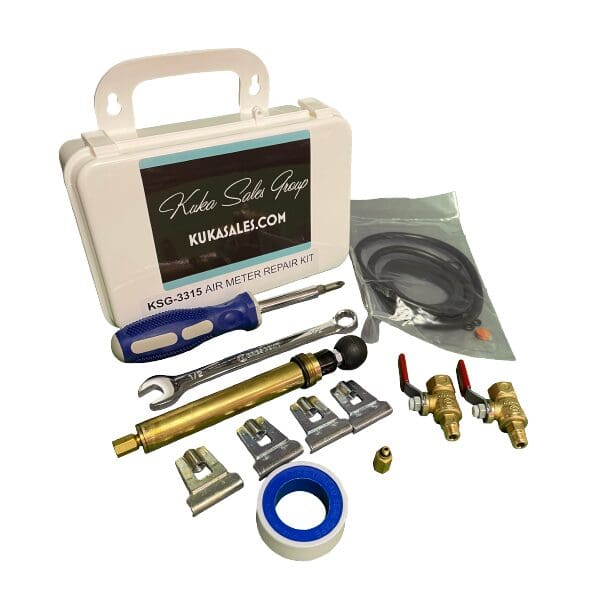
Now to what kind of parts/equipment do you need to keep in your truck to make these repairs? You can piece it together by keeping a couple of petcocks, a replacement check valve, some gaskets, a wrench, etc. in the back seat. However, there is a better way to ensure you have everything you need to fix a leaky air pot as well can be able to find it. We have an air meter repair kit that includes:


Our goal is to help people in the best way possible. Complete the product request form and one of our representatives will get in touch with you.